Nessus 4.0.2 Quickstart on CentOS 5.4
Published: 11/01/2009
Nessus has been around for a long time and is a still a nice, free vulnerability assessment tool. Although the project is now driven by Tenable Network Security, if you're merely interested in discovering it and trying it out for personal use, the HomeFeed subscription is a zero-cost solution to determine whether this is a tool that can be utilized in your own network (consultants should pay for a ProfessionalFeed).
This article provides a cheat sheet on getting Nessus set up on a very minimal instance of CentOS 5.4 (installed with only the "base" package of the OS and nothing else). The management client that interfaces with the Nessus server will be a Windows machine in this example.
References:
Install and configure nessusd
Once CentOS is installed, update all existing packages, disable unnecessary services, install NTP, etc. per any common best-practices guide. Then go to the Nessus website and download the version for "Red Hat ES 5 / CentOS 5." Also download the appropriate Windows client installer for your platform (32 or 64-bit). Be sure to register for a HomeFeed subscription and the corresponding activation code will be sent to you via e-mail.
If you downloaded the RPM package to your Windows machine, you may need to copy it to your server's /tmp directory using a tool like WinSCP. Then SSH into the server and install the package:
$ sudo rpm -ivh Nessus-4.0.2-es5.i386.rpm |
Then add a login for a user to connect to the server and run scans. In this example, an "admin" user is set up for password-based authentication (as opposed to certificate):
$ sudo /opt/nessus/sbin/nessus-adduser Login : adminguy Authentication (pass/cert) : [pass] Login password : 3q8K2ks-ssm.a2k Login password (again) : 3q8K2ks-ssm.a2k Do you want this user to be a Nessus 'admin' user ? (can upload plugins, etc...) (y/n) [n]: y User rules ---------- nessusd has a rules system which allows you to restrict the hosts that adminguy has the right to test. For instance, you may want him to be able to scan his own host only. Please see the nessus-adduser manual for the rules syntax Enter the rules for this user, and enter a BLANK LINE once you are done : (the user can have an empty rules set) [ENTER] Login : adminguy Password : *********** This user will have 'admin' privileges within the Nessus server Rules : Is that ok ? (y/n) [y] [ENTER] User added |
Ensure that the Nessus server has Internet connectivity (although a manual offline method is available for this step) and run the following command with the activation code sent to you when registering on the website earlier. This example uses a fictional activation code as an example:
$ sudo /opt/nessus/bin/nessus-fetch --register 1234-5678-90AB-CDEF-GHIJ |
Verify that the registration has taken place by viewing the following file (not that the HomeFeed subscription has been activated for this server):
$ cat /opt/nessus/lib/nessus/plugins/plugin_feed_info.inc PLUGIN_SET = "200910310134"; PLUGIN_FEED = "HomeFeed (Non-commercial use only)"; |
Edit the Nessus conf file, uncomment the "enable_listen_ipv4 = yes" line:
$ sudo vi /opt/nessus/etc/nessus/nessusd.conf enable_listen_ipv4 = yes |
By default the Nessus daemon (nessusd) listens on TCP 1241. Open this on iptables as needed.
$ sudo /sbin/iptables -A INPUT -p tcp --dport 1241 -j ACCEPT $ sudo /sbin/service iptables save |
SELinux will need to be slightly re-configured to allow nessusd to open a listening port. Edit the SELinux config:
$ sudo vi /etc/selinux/config SELINUX=permissive |
Finally, ensure Nessus starts automatically at boot:
$ sudo /sbin/chkconfig nessusd on |
Reboot the server.
Run a scan from the client
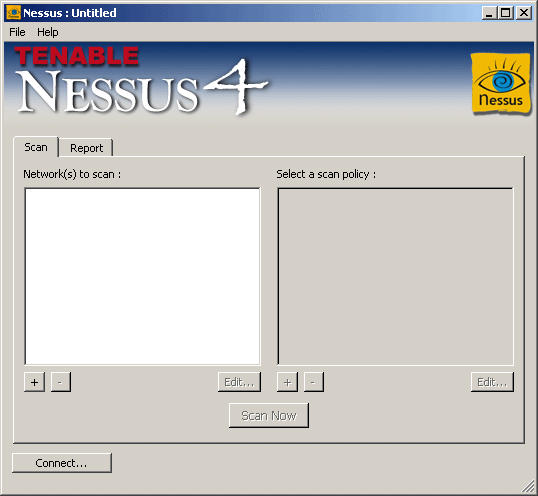
Install the Nessus Windows client if you haven't already done so. Note that if you run the custom install option, you can uncheck the setup for the server code as this isn't necessary. Then run the client and you should see this screen:
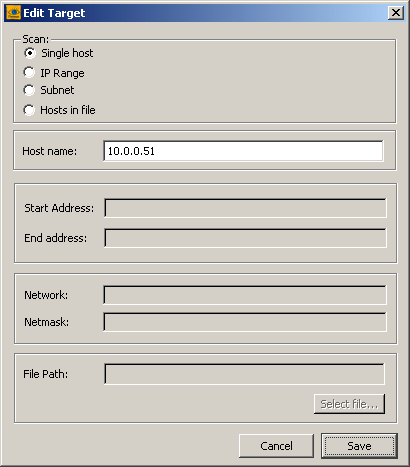
Create a simple scan target profile by clicking on the + button and save it (in the screen below, 10.0.0.51 is a host we're going to scan for vulerabilities):
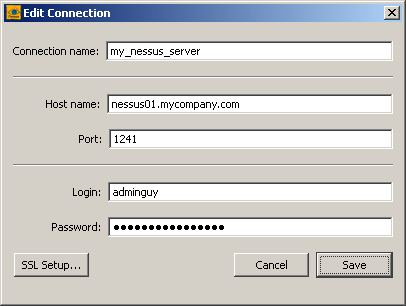
Set up a login profile to connect to the Nessus server by clicking the Connect button and then on the Connection Manager dialog, pressing the + button:
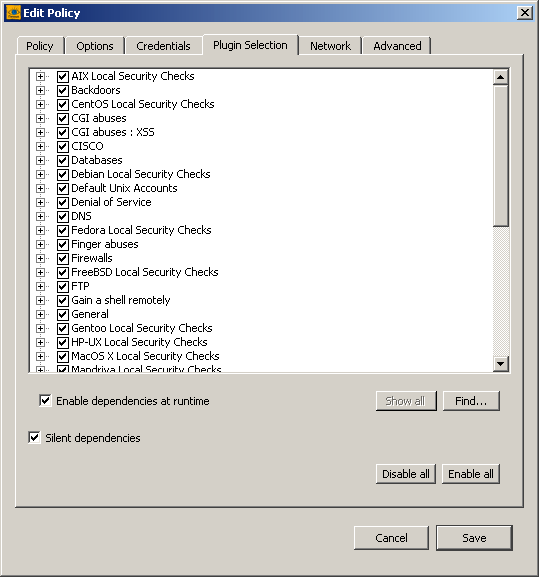
Once that's done, highlight the entry you just created in the Connection Manager and connect to the server. When login is successful, click on the + button under "Select a scan policy." For a first-time experiment, uncheck options that may not apply to your network. For example, if you're not running any AIX or Solaris hosts, uncheck this items under the Plugin Selection tab to make your scan go quicker:
Once you have a scan policy in place, make sure both the item under "Network(s) to scan" is checked and the new scan policy is highlighted. Then press the Scan button. This may take a few minutes, but once done a report will be available in the Report tab. This can also be exported to various formats for review by others.
This, of course, is only a tip of the iceberg, but it's an easy way to jump right in and get started with Nessus. You may find that a lot of warnings pop up revealing potential vulnerabilities that you never knew existed. If the Nessus server is left running, it should update itself with new plugin information every 24 hours by default. Refer the user guide linked above for more information.
Go back to the main articles list.