Snort Quickstart on CentOS 5.5 (x86)
Published: 02/24/2011
A phrase that keeps ringing in my head long after taking the SANS 401 class is, "Prevention is ideal but detection is a must."
No matter how tight you run your firewalls or how glued you are to your logs all day, something can inevitably slip by, especially if you blindly allow port 80 inbound (or outbound from your trusted internal network).
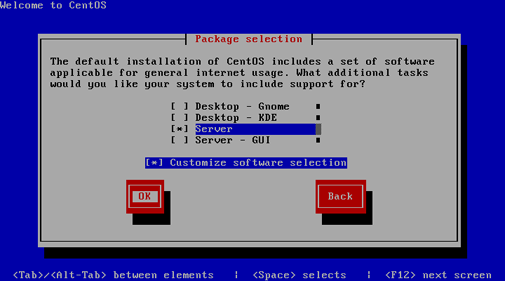
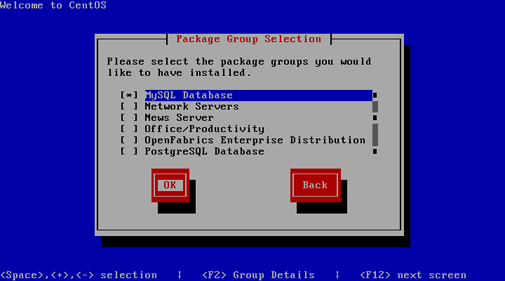
Because Snort can be somewhat frustrating for beginners to install from source with all the various dependencies, especially on a Linux system that only has the bare minimum of components installed , this article is designed as a straight path to getting from zero to a full-working IDS within an hour (depending on the speed of your Internet connection). The CentOS 5.5 setup used as an example here does not use a default installation of the operating system, but rather a customized installation with only Apache httpd and a SQL database as the add-ons (during the OS install, check the "Server" package, select "Customize software selection," and unselect everything except "MySQL Database" and "Web Server"). It is assumed this is your starting point for the most secure platform possible with no gimmick services running.


The majority of this exercise was sourced from the Snort 2.8.6 on CentOS 5.5 install guide. However, at the time of this writing Snort 2.9.0.4 is the latest available and there were some quirks in following that guide to the letter (hence this article).
The machine has two interfaces. eth0 is used for management while eth1 will be the sniffing interface. Copy and paste the commands listed here as root.
First, a few things...
 More Information
Even with such a minimal install, CentOS still has a little bloat. Disable SELinux (I don't like this idea, but the Snort guide mentioned above recommended it) and temporarily stop iptables. Then install sudo, create an account for yourself, then add your account to the sudoers list.
# service iptables stop
# vi /etc/selinux/conf

	SELINUX=disabled

# chkconfig netfs off
# chkconfig httpd on
# chkconfig mysqld on
# service netfs stop

# yum -y install sudo
# visudo
|
Onto the show...
 More Information
Now let's really get started. Start httpd and MySQL, then perform a system-wide update to ensure we're running the latest versions of the packages we have installed. We'll also need to add some Snort-specific dependencies before we actually download and compile Snort itself. Since time-keeping is important, also install an NTP client and if required in your environment, edit /etc/ntp.conf and point it to your internal NTP host
# service httpd start
# service mysqld start

# yum -y update
# yum -y install mysql-bench mysql-devel php-mysql gcc pcre-devel php-gd gd glib2-devel gcc-c++ ntp flex bison wget make

# vi /etc/ntp.conf

	server 10.1.1.30

# chkconfig ntpd on
# service ntpd start

# vi /etc/ssh/sshd_config

	PermitRootLogin no
	PermitEmptyPasswords no

# service sshd restart
|
Create a temp directory to download all Snort-related install files into. Once the DAQ and Snort packages are downloaded, rename them so they are actually called "daq-0.5.tar.gz" and "snort-2.9.0.4.tar.gz." Note that by the time you reference this article, the package versions may be different and the corresponding downloads link will be updated. Check the Snort site for the latest. Due to a potential incompatibility issue with the latest version of Libpcap (1.1.1 as of this writing), the example here uses 1.0.0 instead.
# mkdir -p /tmp/snortinstall
# cd /tmp/snortinstall

# wget http://www.snort.org/downloads/752
# wget http://www.snort.org/downloads/745
# wget http://www.tcpdump.org/release/libpcap-1.0.0.tar.gz
# wget http://libdnet.googlecode.com/files/libdnet-1.12.tgz

# mv daq-0.5.tar.gz\?AWSAccessKeyId\=AKIAJJSHU7YNPLE5MKOQ\&Expires\=1298608624\&Signature\=NRtAFdlpP78xEKr5z%2FGrLYiv3Vs\= daq-0.5.tar.gz
# mv snort-2.9.0.4.tar.gz\?AWSAccessKeyId\=AKIAJJSHU7YNPLE5MKOQ\&Expires\=1298608601\&Signature\=MWVhG2s3HZwyzzqWFbT%2Fct1JHnM\= snort-2.9.0.4.tar.gz

# tar xzvf daq-0.5.tar.gz
# tar xzvf libpcap-1.0.0.tar.gz
# tar xzvf libdnet-1.12.tgz
# tar xzvf snort-2.9.0.4.tar.gz
|
Now it's time to look busy while you configure, compile, and install. Anyone looking over your shoulder will know how busy of a professional you are because your screen is scrolling with all kinds of mysterious "Matrix code." That's why they pay you the big bucks.
# cd libpcap-1.0.0
# ./configure
# make
# make install

# cd ../daq-0.5
# ./configure
# make
# make install

# cd ../libdnet-1.12
# ./configure
# make
# make install

# cd ../snort-2.9.0.4
# ./configure --with-mysql --enable-dynamicplugin  --enable-zlib --enable-ipv6 --enable-normalizer
# make
# make install

# groupadd snort
# useradd -g snort snort -s /sbin/nologin
# mkdir -p /etc/snort/rules
# mkdir -p /etc/snort/so_rules
# mkdir /var/log/snort
# chown snort:snort /var/log/snort
# cd /tmp/snortinstall/snort-2.9.0.4/etc
# cp * /etc/snort
# cd ../..
# mkdir rules
# cd rules
|
You should download some recent Snort rules. You can either purchase a subscription for the latest available or opt for the free versions that are one-month old by registering on the Snort site. Once you download the file (for example: snortrules-snapshot-2903.tar.gz), copy it to your machine's /tmp/snortinstall/rules/ directory. The next steps assume you're currently there.
# tar xzvf snortrules-snapshot-2903.tar.gz
# cd rules
# cp * /etc/snort/rules
# cd ../so_rules/precompiled/Centos-5-4/i386/2.9.0.3/
# cp * /etc/snort/so_rules/
# cd /tmp/snortinstall/rules/etc/
# cp sid-msg.map /etc/snort/
# mkdir -p /usr/local/lib/snort_dynamicrules
|
Edit the Snort configuration file by replacing a couple of existing lines in the rule path references and then add the third line in the output section.
# cd /etc/snort
# cp snort.conf snort.conf.original
# vi snort.conf

	var RULE_PATH /etc/snort/rules
	var SO_RULE_PATH /etc/snort/so_rules

	output unified2: filename snort.log, limit 128
|
Set up the database and create a password for it (in this example, the password is W9dIsN2sJ). When entering the first "echo" command, you will be prompted. Simply hit Enter. For all the rest of the echo commands afterwards, use the new password just set.
# cd /tmp/snortinstall/snort-2.9.0.4/
# echo "SET PASSWORD FOR root@localhost=PASSWORD('W9dIsN2sJ');" | mysql -u root -p
# echo "create database snort;" | mysql -u root -p
# mysql -u root -p -D snort < ./schemas/create_mysql
# echo "grant create, insert on root.* to snort@localhost" | mysql -u root -p
# echo "SET PASSWORD FOR snort@localhost=PASSWORD('W9dIsN2sJ');" | mysql -u root -p
# echo "grant create, insert, select, delete, update on snort.* to snort@localhost" | mysql -u root -p
|
Install PEAR.
# yum -y install php-pear
# pear upgrade --force http://download.pear.php.net/package/PEAR-1.9.1.tgz
# pear install Numbers_Roman
# pear install channel://pear.php.net/Numbers_Words-0.16.2
# pear install Image_Color
# pear install channel://pear.php.net/Image_Canvas-0.3.2
# pear install channel://pear.php.net/Image_Graph-0.7.2
# cd ..
|
Install ADODB and BASE.
# wget http://sourceforge.net/projects/adodb/files/adodb-php5-only/adodb-511-for-php5/adodb511.tgz/download
# wget http://sourceforge.net/projects/secureideas/files/BASE/base-1.4.5/base-1.4.5.tar.gz/download
# cd /var/www
# tar xzvf /tmp/snortinstall/adodb511.tgz
# mv adodb5/ adodb/
# cd /var/www/html
# tar xzvf /tmp/snortinstall/base-1.4.5.tar.gz

# mv base-1.4.5/ base/
# cd base/
# cp base_conf.php.dist base_conf.php
# vi base_conf.php

	$BASE_urlpath = '/base';
	$DBlib_path = '/var/www/adodb';

	$alert_dbname   = 'snort';
	$alert_password = 'W9dIsN2sJ';

# service httpd restart
|
Now step away from the command line for a few seconds. Open a web browser and point it to your Snort box (https://10.1.1.15/base/). Click on the Setup Page link, and then in the next page click on Create BASE AG. Then back on the command line...
# mkdir /var/www/passwords
# /usr/bin/htpasswd -c /var/www/passwords/passwords base

(create a password the user "base" - you'll need this when you log into the web server)

# vi /etc/httpd/conf/httpd.conf

	<Directory "/var/www/html/base">
	        AuthType Basic
	        AuthName "SnortIDS"
	        AuthUserFile /var/www/passwords/passwords
	        Require user base
	</Directory>

# service httpd restart
|
Time for Barnyard. If you're using CentOS 5.5 on a 64-bit platform, you'll need to adjust the MySQL lib path to "lib64" per below when configuring Barnyard.
# cd /tmp/snortinstall/
# wget http://www.securixlive.com/download/barnyard2/barnyard2-1.9.tar.gz
# tar xzvf barnyard2-1.9.tar.gz
# cd barnyard2-1.9
# ./configure --with-mysql-libraries=/usr/lib/mysql
# make
# make install
# cp etc/barnyard2.conf /etc/snort/
# mkdir /var/log/barnyard2
# chmod 666 /var/log/barnyard2/
# touch /var/log/snort/barnyard2.waldo
# chown snort:snort /var/log/snort/barnyard2.waldo
# vi /etc/snort/barnyard2.conf

	config hostname:        thor
	config interface:       eth0
	output database: log, mysql, user=snort password=W9dIsN2sJ dbname=snort host=localhost
|
It's now time to test Snort itself!
# /usr/local/bin/snort -u snort -g snort -c /etc/snort/snort.conf -i eth0
|
If everything's working, then you should see an "Initialization Complete!" message. If not, check /var/log/messages for any potential configuration errors. Now edit /etc/rc.local to have Snort and Barnyard automatically start up at boot while bringing eth1 up as the sniffing interface.
# vi /etc/rc.local

ifconfig eth1 up
/usr/local/bin/snort -D -u snort -g snort -c /etc/snort/snort.conf -i eth1
/usr/local/bin/barnyard2 -c /etc/snort/barnyard2.conf -d /var/log/snort -f snort.log -w /var/log/snort/barnyard2.waldo -D

# /etc/rc.local start
|
Done! Well, almost. Time to bring iptables back online, although you may want to edit the ruleset first. In this example, the /etc/sysconfig/iptables file reflects the Snort machine's management IP of 10.1.1.15. Season to taste.
# vi /etc/sysconfig/iptables

	*filter
	:INPUT DROP [0:0]
	:FORWARD ACCEPT [0:0]
	:OUTPUT ACCEPT [183:18720]
	-A INPUT -d 10.1.1.15 -p tcp -m tcp --sport 80 -m state --state RELATED,ESTABLISHED -j ACCEPT
	-A INPUT -d 10.1.1.15 -p tcp -m tcp --sport 443 -m state --state RELATED,ESTABLISHED -j ACCEPT
	-A INPUT -s 10.1.1.21 -d 10.1.1.15 -p udp -m udp --sport 53 -j ACCEPT
	-A INPUT -s 10.1.1.22 -d 10.1.1.15 -p udp -m udp --sport 53 -j ACCEPT
	-A INPUT -s 10.1.1.30 -d 10.1.1.15 -p udp -m udp --sport 123 -j ACCEPT
	-A INPUT -s 10.1.1.0/255.255.255.0 -d 10.1.1.15 -p tcp -m tcp --dport 22 -j ACCEPT
	-A INPUT -s 10.1.1.0/255.255.255.0 -d 10.1.1.15 -p tcp -m tcp --dport 443 -j ACCEPT
	-A INPUT -s 10.1.1.0/255.255.255.0 -d 10.1.1.15 -p tcp -m tcp --dport 80 -j ACCEPT
	-A INPUT -s 10.1.1.0/255.255.255.0 -d 10.1.1.15 -p icmp -j ACCEPT
	COMMIT

# service iptables start
|
One final thing - this minimal install of CentOS 5.5 does not come with tcpdump. If you want it...
# cd /tmp/snortinstall/
# wget http://www.tcpdump.org/release/tcpdump-4.0.0.tar.gz
# tar xzvf tcpdump-4.0.0.tar.gz
# cd tcpdump-4.0.0
# ./configure
# make
# make install
|
Clean up /tmp and reboot the server if the yum update earlier involved a kernel patch. Happy Snorting!
Now set up your TAP / SPAN port / hub connection so Snort can spy on your Facebook users to ensure everyone conforms to the corporate security guidelines. Test Snort to see if it catches anything by adding a rule in the /etc/snort/rules/local.rules files like so:
alert tcp any any -> any 6767 (msg:"ADMIN TEST RULE 001 - TCP 6767"; sid:99990001; rev:1;)
|
Then use telnet or netcat to throw an "evil" packet past Snort's nose and see if it shows up in BASE.
Go back to the main articles list.


 More Information
 More Information